Feeds:
Posts
Comments

2014-06-05 18.28.41


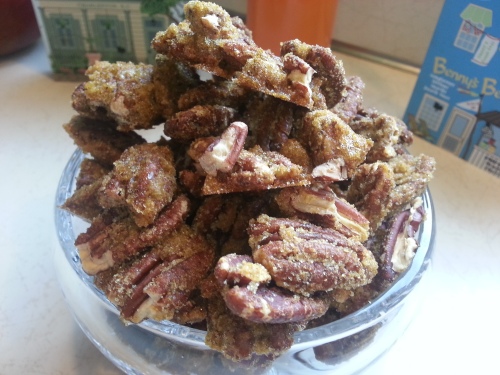
I just cannot tell how utterly addictive these nuts are.  No.  Really.  Seriously, to-die-for nuts.  Don’t just take my word for it.  Go make them!

I get my pecans at Costco.  Not sure they are actually cheaper there, but they are always a good quality (which means truly WHOLE pecans, rather than pieces).

I’m keeping this post simple for ya.  Here are the ingredients:

1 pound of whole pecans

1 egg white

1 teaspoon water

3/4 cup sugar

2 Tablespoons curry

3/4 tsp salt

Cooking spray


Now……here’s watcha do!

Pre-heat oven to 250.  Put pecans in a single layer on baking sheet and cook for approximately 10-15 minutes or until you can begin to smell delicioussness wafting through your kitchen.  Take pecans out and just set them aside for now.  Blend sugar, curry and salt in a bowl.  Set aside. Whisk egg white and water until frothy in a large bowl.  Toss pecans in egg white mixture (quickly….you don’t want to cook the egg), and then pour the sugar/curry/salt mixture on top and stir, stir, stir, until all pecans are well coated.  I am not a fan of “cooking spray”, but do use it in this recipe…..some are better than others (like olive oil).  In any event, lightly spray the pan you used to roast the pecans initially and place coated pecans back onto the tray in a single layer.  Cook at 250 for at least 1 hour or until they are dry.  Stir them once or twice while cooking.

That’s it!!  How easy is that?!?!  Okay, now you’re ready to taste a bit of heaven.  Ready?  GO!

OH!  Also super duper good on ice cream (especially The Brown Cow ice cream.  Fo shizzle)!!!

http://www.browncowicecream.com/


Mangia Mangia Mangia

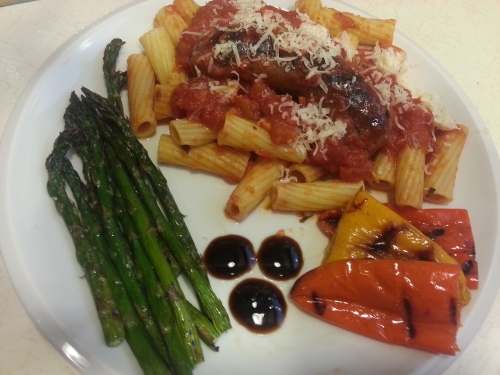
2014-05-14 19.57.38

Pasta with Marinara

Grilled Italian Sausage

Grilled Asparagus

Grilled Mini-Sweet Peppers

A Sprinkle of Parmesan Cheese & A Drizzle of Balsamic Glaze

I’ve had people comment that tonight’s dinner looked “amazing”, and “fancy”, and although I have to admit that it was indeed quite tasty, I promise you it was far from hard to make.  I promise, promise, promise.

Marinara

I will have to post the “recipe” (uhh…..I don’t follow a recipe or measure, but I will make one for you to follow at some point) for my marinara sauce at a later date.  For the time being, follow your own fabulous marinara recipe, Google one, or what the hell…..use your favorite jarred sauce.  I tend to make a large batch of marinara and freeze it into nice sized portions.  This makes it easy peasy to use on a busy night.

Sausage

Once you have your marinara made or bought, all you need to do is fire up the grill.  While the grill is heating up, I recommend simmering the sausage in a bit of water on the stove top to ensure thorough cooking.  This will allow you to put the sausage on the grill over medium heat, obtaining that nice grilled color and lines, AND knowing that there won’t be any raw center.  I know I have some grilling guru friends out there that would be able to chime in and recommend a much better way, but……I’m just filling ya’ll in on what I do.  I’m not an amazing cook, just someone that loves to do it! ; )  PLEASE comment if you have an excellent way to grill sausage.  I LOVE to learn!

Asparagus & Peppers

As the sausage was simmering, I trimmed and washed my asparagus and peppers, and started the water for the pasta.

I never use a knife to trim my asparagus.  I cannot remember where I was taught this method, but this is what I do…….hold the asparagus with one hand on the bottom end and one hand gripping toward the middle (gah!  I should start taking pictures of my prep!).  Gently bend the bottom end up.  The asparagus will naturally snap where the more fibrous part of the stem ends.  As for the peppers, I simply cut the stem part off and cleaned out the seeds.  Put the asparagus and peppers in a dish.  Drizzle with olive oil and give a few shakes of sea salt; toss.

Since my sausage was already “poached”, I was able to put the sausage, asparagus, and peppers all on the grill at the same time.  You’ll want to periodically check your feast, giving everything a few turns to make sure the golden grilling goodness is shared across all meat and veggie surfaces.  ; )

Fancying Things Up

Okay.  Let’s make things  “fancy”, the easy April way!

This:

Blaze

& This:

Parmesan

Make a fancy design with that balsamic glaze.  It’s delicious with the grilled veggies, and sprinkle away with the Parmesan.  It is mmmmmm…….scrumpdillyumptious!

Now. Go. Eat.

Wake Up, Colon!

2014-05-14 07.25.21

I believe it was last year, right around this time…., May-ish, that I invested in a Blendtec super duper high powered blender. I had been previously making smoothies of all sorts in my regular run-of-the-mill blender with less than ideal results. You see….when you try to incorporate lots of goodness (chia seeds, flax, hemp seeds, spinach, kale, yada yada yada) into a smoothie, a regular blender often leaves you with more grit and chunks than your palate can truly enjoy. Behold the Blendtec!

2014-05-14 12.35.41

Now my smoothies are smooooooooth, just as they should be. : ) The Blendtec comes with a handy dandy cookbook with tons of delicious smoothie recipes as well as soups, dips, batters, etc. I still use cookbooks (or the internet) from time to time (okay, OFTEN) to get a basic idea for inspiration, and then take off from there.

My friend, and should-have-already-been-family-member by way of marriage, Joel, named the smoothie shown above, by way of Facebook “liking”,  the “Wake Up, Colon!”. Now…..I honestly never measure ingredients when making most things, but I will do my best to start measuring for future posts. For now…..these guesstimates will have to do, and you can go forth with your own tweaking (which, by the way……..all the goodness that I add is optional.  You would have a delicious smoothie from just the berries, PB2, milk, and ice!). Happy smoothie making.

Wake Up, Colon!

  • 1 cup frozen blueberries
  • 1 cup frozen strawberries
  • 1/4 cup raw organic shelled hemp seeds (I buy mine from Amazon)
  • 1 scoop whey protein
  • 2-3 Tablespoons ground flax
  • 1-2 Tablespoons chia seeds
  • 1 Tablespoon coconut oil
  • 3-4 Tablespoons of PB2 (also purchased from Amazon…….you can also just use regular ol’ peanut butter instead)
  • 2 cups or so of coconut milk (almond milk, soy milk, or cow’s milk does just fine too)….adding enough milk so the smoothie will actually blend
  • 1 cup or so of ice

This will make approximately 4 mason jars full, so if you are making a smoothie for one, I would suggest cutting the amounts in half and pouring yourself a nice tall one (smoothie, of course!).


Dinna!

Image

I’m baaaaack! : )  Or….I’ll try to be back.  I have not posted anything on this blog for the past 3 years.  That is cray cray.  Anyhoo…..Here you have tonight’s quickly put together dinner.  Marinated and grilled chicken breasts, grilled asparagus, and grilled pineapple.  It had to be all about the grill today.  It is beauuuuutiful outside in Chicagoland right now, and absolutely perfect for grilling.  But….really….who am I kidding?  There is almost NEVER a bad time to grill.  : ). 

Today I really had no idea what we were going to have for dinner, aside from the fact that it would include chicken breasts.  I actually thought my grill was out of propane (I know, I know….charcoal tastes WAY better – truth), but when I decided to just give it a go, to my surprise it lit right up.  Total bonus to my day.  : )  I decided to whip up a marinade for my chicken to sit in for the enormous amount of time I allowed my grill to heat up, burn all the crap off from the last time it was used (???), and for me to scrape, scrape, scrape.  I am being facetious when I say an enormous amount of time to sit in the marinade.  I guess my point is…..although my preference is to let meat/poultry/anything really, sit in a marinade for as long as possible (24 hours), it is totally not necessary in order to get a great taste infused.  Heck…..even my kids ate it!  ; ).  After I plopped the chicken breasts in the marinade (unusual for me…..I usually pound it thin or cut the breasts in half horizontally to thin them), I saw the perfectly ripe pineapple sitting on my counter, and also remembered I had half a package of fresh asparagus left in my fridge.  Voila!  My dinner was born.  I tossed the asparagus with a little olive oil, Himalayan sea salt (fancy, I know!…thanks, Mom!), and pepper, and simply sliced my pineapple in thick slices suited for grilling (probably about 3/4 – 1 inch thick).  I did leave some pineapple ungrilled for the picky ones.  ; ) 

This is what my marinade included……..(and please remember, with thrown together meals, I never ever measure…..sorry!  If you MUST have some sort of round-abouts measurements, HOLLA!)

Marinade:

Soy sauce

Ginger (powdered)

Balsamic vinegar

Olive oil

Minced garlic

I think that’s it.  : /


So, tonight I am pairing some delicious meatballs I made….I dunno….a couple of weeks ago and stuck in the freezer…..with the nutty goodness of quinoa.  Tonight I am adding spinach to the quinoa for a little variety.  I think there are two groups of people when it comes to quinoa…….those that have never heard of it and those are on the health kick quinoa band wagon.  Well, maybe there is a third group…the one that I’m in.  Someone that loves quinoa, but has yet to exhaust all the ways to cook it (is that even possible?) and is also not willing to give up the unhealthy alternatives!  Anyway…tonight…..presenting….quinoa!

Whatcha, whatcha, whatcha need…… (hear Beastie Boys?)

  • 1 Cup quinoa
  • 2 cups chicken broth (or veggie broth)
  • 2 Tablespoons olive oil
  • 1/2 onion, finely chopped
  • 2 or 3 or 4 cloves garlic, finely chopped
  • salt (if you know me, you know I prefer salt from the sea ; ) )
  • pepper
  • 1/2 cup or a splash or two more of white wine (can use broth as an alternative)
  • about 4 cups of greens (collards, swiss chard, mustard greens, spinach….)….these cook down, trust me!  Fresh is best, but you can use frozen if you thaw and squeeze as much moisture out as possible.
  • 1/4 cup parmesan cheese (this can easily turn into the entire block in my house!  can’t get enough of it)
  • Hot sauce…a splash will do ya (make it hot if you like)….my favorite hot sauces……Siracha, good ol’ Tabasco, Cholula ….what’s yours?

Bring your chicken or veggie broth to a boil before adding your quinoa.  Add quinoa, bring back to a boil and cover, reducing heat, for about 15 minutes or until all the broth has been absorbed. Set aside.

Now, in a large saucepan, heat your olive oil over medium heat.  Toss your onion, garlic, salt and peppa into the pan and cook over medium to low heat until your onions are soft and your house is smelling oh so good.  I think 4 to 5 min will do it.  Watch the garlic though.  You don’t want it to burn.  Add the wine and hot sauce to the onion mixture.  Bring it to a simmer for only a couple of minutes.  The goal here is just to heat that vino up.  Mmmm…..you can pour yourself a glass too if you feel so inclined!

Throw those greens into the pan with the wine and onions.  Oh yeah!  things are coming together!  Toss the greens to coat and cook for a few minutes (3 or 4?).  Add your quinoa and cook for another 3 or 4 minutes.  Ok…..give it a taste.  Need more salt?  Peppa?  Hot sauce?  Now’s the time.

Ok…here’s the best part………bring on the parmesan!  Add it in and give your dish a final stir before serving.

Mmmmmm……so good!

Have you gone out and bought a pork shoulder?  Here’s the sauce I like to top it off with.  Enjoy!

Here’s whatcha need:

  • 1 cup cider vinegar
  • 1 Tablespoon brown sugar (mmm…..love this stuff!)
  • 1 Tablespoon salt (I go for the stuff from the sea)
  • 1 teaspoon crushed red pepper flakes
  • 1/2 teaspoon cayenne pepper (more if you like it HOT)

Now….I usually would tell you to double this recipe because I douse my pulled pork with it.  Some might say I “drown” it, but….start with this smaller portion.  If you love it….well….double it up!

Let’s try this again, shall we?

And…..just a warning…..this is more of a recipe within a story than just a recipe.  Enjoy!

Ok….so, there is something about some good pig, cooked low and slow, that just makes my mouth water.  And….yes, I know what you are thinking….you are thinking, if it is THAT good, it must be complicated, but you are wrong.  Wrong, I tell ya!

There is so much beauty in this dish, it is hard to know where to start!   Do I start by telling you this is a dish that can cook while you sleep?  Do I begin by telling you that there ain’t a soul in your house that won’t chow down on this for as many nights as there are leftovers (which won’t be many!)  or Do I let you know just how versatile this dish is and how many different things can be made with this melt in your mouth, most irresistible, Big ‘O’, DELICIOUS piece o’ pig???  And I could go on and on…  How ’bout I start with telling you what you need!

  • 1 meaty pork shoulder….I prefer bone in (more flava, I think), but I am not opposed to a nice boneless piece o’ pork either.
  • Chili powder
  • Garlic powder
  • Salt
  • Pepper
  • Vinegar (optional) and any type will do….malt, apple cider…whateva!

Vinegar? you say!  Yep!  Vinegar.  Again, it isn’t necessary, but….well, when your second home is North Carolina and you have grown up on the sinfully delicious southern bbq like I have, vinegar gives it the beginning of that ‘kick’ that I end up finishing it off with.

Oh….I’m going to have to digress from the recipe for a minute, and with southern hospitality, educate some of my most precious and dear Midwest friends that don’t have a clue what on earth I am talking about.  I have seen it happen many times.  I say I am having “barbecue” for dinner and they say “barbecued what?”.  Barbecue, just….barbecue!  You see, in the south, that ooohhh so good melt in your mouth pulled pork is considered “barbecue” and is finished off with a delicious vinegar based sauce.  No ketchup or catsup in that!  And, actually, to be a bit more accurate, I should point out that the southern states all have their own twist, but if I have to be honest…….well, North Carolina’s barbecue rocks the house!  Ok….sorry…now, on with the recipe!

Simple, simple, simple!  Simple food most often always = good food.

Preheat your oven to 200 degrees.  That is not a mistake.  200!

Give that shoulder a good rinse (I rinse all my meat) (***get your mind out of the gutter!!***) and make sure you pat it with paper towels until nice and dry.  Set it in the pan you will be cooking it in.  I love to use my stoneware dish that has a domed stoneware top.  You can use a dutch oven or any covered dish that will a)  fit the shoulder and b)  go in the oven.

Sprinkle salt all over the top, followed by pepper, then garlic powder and finally the chili powder.  NO SKIMPING on the chili powder.  I want that pig to look like it has been preserved with chili powder.  I want it to look that beautiful shade of red that only chili powder can give you (well….there are other amazing spices, but….. ; )). Anyway, no skimping.  You want to give that shoulder a nice spice rub down.  Once the top is coated, flip it over and repeat on the other side.  Then flip back over again so the fattier part of the shoulder is facing up.  There shouldn’t be too much fat, but you need a little.    If there seems to be too much fat, cut some off BEFORE seasoning it.

Now…..drizzle the vinegar over the top of the meat.  How much???  Ugh, I don’t know!  Just go for it.  I would guesstimate, 1/2 cup???  Sheesh…you are asking me to measure?  No need to add any additional liquid….even if you opt out of using the vinegar, the meat itself will produce scrumptious juices.

Ok, put the lid on and you are ready to pop that baby in the oven at 200 and let ‘er cook!  I highly  recommend you put it in before going to bed at night and it will be ready for you the next day making it a delicious lunch and much more for dinner.  I like to let it cook for at least 10 hours.  If you are like me though and completely forget to do it before bed (****again, avoid the gutter!***), you can, without sacrificing any flava, do it in the morning ; ), pop it in….eh, 10ish at 250 degrees, until dinner time. I crank the heat up to 350 degrees for the last 45 minutes or so.

Ok….sorry…see…..here is my problem.  I don’t measure my ingredients and I don’t have a specific time to cook for.  I just love to smell my food and watch it.  That is how I read if it is ready….I suppose that is why some people might see my recipes as being complicated…..because they are not always specific enough, which I DO understand can be a challenge for “non” cooks.  Sorry!!!  I’m doing my best, but you have to trust me, and more importantly, trust yourself, that if you are using great ingredients, you can’t go wrong (whether you use a little too much or a little too little).  Well, salt may be overused sometimes….ok…that is another story.  DIGRESSION.  Eeek.  Those happen way too often!

Ok….so, once that shoulder has been cooking low and slow for a nice chunk of time, you are done!!!  Dats right!  Done!  Take the meat out and shred it with a couple of forks.  Now….there are SO many things you can do with this.  I mean, really!  The list is endless, but let me share with you my favorites….

  • Serve it topped with that southern vinegar based bbq sauce I mentioned. (recipe to follow)  On a bun or off, delish!  Get yourself a side of coleslaw (I should post that recipe too!) and some oven sweet potato fries (yet another UBER easy recipe!).
  • Serve it with your favorite ketchup based bbq sauce….my favorite, if it is not homemade, is Sweet Baby Ray’s.  Yummy!  Some delicious oven fries and some sort of veggie….must have a veggie or fruit….hey, how ’bout a slice of watermelon!
  • Serve it Mexican style!  You can’t go wrong with shredded pork that can be seasoned up with your own taco seasoning mix or the $1 taco seasoning packets and topped with all the glorious and wonderful fixin’s….sour cream, salsa, shredded cheese, and don’t, DON’T forget the guac!  Tacos, burritos, tostadas…oh my!

Ok….I could go on with more ideas, but I’d love to hear yours!  Take some time to make this pork and let me know what YOU do with it.

I think I now have many recipe ideas floating around in my noggin that I will need to post about.  And…..I promise they won’t all be so lengthy in my crazy verbiage

Happy eating!
UGH!!!!!  I had a great post written and some maniacal evil force came and made it become invisible in front of my very eyes!!!!  ARGH!  I will redo it, I promise…..and maybe I will make it even better than the first time……..ok….everyone say it……..”that’s what SHE said.”

Pancakes!

I’ve often thought….what’s the difference between a pancake and a doughnut for breakfast?  I mean…..they can both be seriously packed with sugar (and of course, that’s the deliciousness to them!), but as a mom, I know for some strange reason, most people, myself included, seem to believe that pancakes are healthier.  Typically they are not necessarily healthier, but…alas!…..there are many ways to sneak nutrition into them……the kids won’t even know…I promise!

Whether you are a sworn “by scratch” type of person, or one that would never consider making it harder for yourself than you have to (box mix), probably one of the easiest add ins you can do for nutrition in pancakes is to crack an egg or two into your batter.  Voila!  Protein!  Other easy add ins that should be able to go unnoticed, as long as you don’t go overboard include:  wheat germ and ground flax seed.  Now….if you don’t mind them even heartier, ask me for those suggestions.

Toppings for pancakes can also add nutrition!  Add some fresh fruit piled high.  Bananas are always easy, as are sliced strawberries.  If good fresh fruit just isn’t something that keeps for long in your house or you are having trouble finding good fruit in your store, go with frozen berries.  Now…you don’t want to ruin your deliciously warm pancakes by topping them with frozen berries, but in the blink of an eye you can have a gourmet looking, but out of the box ease, berry compote.  Simply put some frozen berries in a small sauce pan with a sprinkle of sugar.  Cook over low heat until heated through.  Mmmmm….delicous!

Do you have other suggestions?  I’d love to hear ’em!

Chicken Stir-fry

Picture to arrive soon!

Yum!  I love stir-fry dinners.  Some of you already know that we subscribe to a wonderful CSA in our area….Gibbs Family Garden.  Farmer Dan supplies with some of the very best vegetables!  We are in the second week of the growing season and already we are getting some fabulous finds.  One of the veggies we are now receiving is bok choy, otherwise known as Chinese cabbage.  Mmmmm!  I love bok choy.  What?  You haven’t heard of it???  Well….welcome to stir-fry land!  One of my favorite ways to prepare bok choy is to use it in….yes!  stir-fry.  So….here’s the thing about stir-fry dinners……you can totally use what ever veggies you have on hand.  Tonight I will be using mushrooms, green onions, garlic, broccoli, and…..bok choy!  There are several good things to be said about stir-fry, but here are some to consider:  they are healthy (assuming you don’t overload it with very high sodium soy sauce), they are very quick to make, it’s a good way to use up any veggies yet to be eaten.  O.k….I know you are anxious to see the recipe ; )…..here you go.  Enjoy!!

3/4 cup chicken broth

1/4 cup soy sauce (can use low-sodium)

2 tablespoons cornstarch

1 Tablespoon peanut oil or vegetable oil

2 boneless skinless chicken breasts, cut into thin strips

I used a whole head of bok choy (me likey bok choy!) —-you can use celery instead—approx. 1 1/2 cups

4 large mushrooms sliced

3 green onions sliced

Garlic to your tasting–I used lots!

A large handful of broccoli—or whatever other veggies you want!

1/2 cup slivered almonds, toasted

A swirl of sesame oil

2 cups hot cooked rice

  • Combine first 3 ingredients in a bowl, set aside.  NOTE:  I double the ‘sauce’ part because the peeps in my house tend to like it more on the saucy side.
  • Pour peanut or veggie oil into a wok preheated to 375 degrees  or a large skilled over medium-high heat.  Add chicken; cook, stirring constantly, 3 to 4 minutes or until chicken is browned.
  • Add celery, bok choy or whatever veggies you are using—all veggies go in now.  Cook, stirring constantly, 3 to 4 minutes or until veggies are tender and chicken is done, done, done…..no pink chicky please!
  • Stir in broth mixture (if you make a double batch, like me, pour in 1/2 and gradually add until you get it as saucy as you want it), and cook, stirring constantly, until mixture thickens and boils.  Boil 1 minute, stirring constantly.  Stir in almonds….if you don’t have ’em….don’t sweat it!  Serve over rice.

Happy Stir-fry!!